We have all been there. It is 9:00 PM on a weeknight, you are unwinding on the couch, and a massive craving for a sweet, creamy slice of cheesecake hits you out of nowhere. For years, my immediate reaction was to either dig through the pantry for processed cookies or accept defeat because making a real cake meant pulling out ten different ingredients, creaming butter, and dealing with a mountain of messy dishes.
When I started focusing on a high-protein, clean-eating lifestyle to fix my energy slumps, traditional sugar-loaded baked goods were completely off the table. I needed a dessert that felt incredibly indulgent but was healthy enough to eat for breakfast.
I kept seeing the viral 3-ingredient greek yogurt cake popping up all over my social media feeds. I’ll admit, I was completely cynical. Most viral baking hacks turn out to be a total disappointment in real life. My first attempt using a basic online recipe was an absolute disaster. The cake came out of the oven looking like a flat, rubbery hockey puck that tasted overwhelmingly like scrambled eggs. It was dense, wet, and incredibly depressing.
I knew the concept had potential, so I ran back to my kitchen to experiment with the science of egg proteins. I discovered that if you vigorously whisk the ingredients to trap air, use a specific starch ratio, and bake it using a gentle temperature strategy, the proteins don’t scramble. Instead, they rise up into a pillowy, velvety, soufflé-like custard.
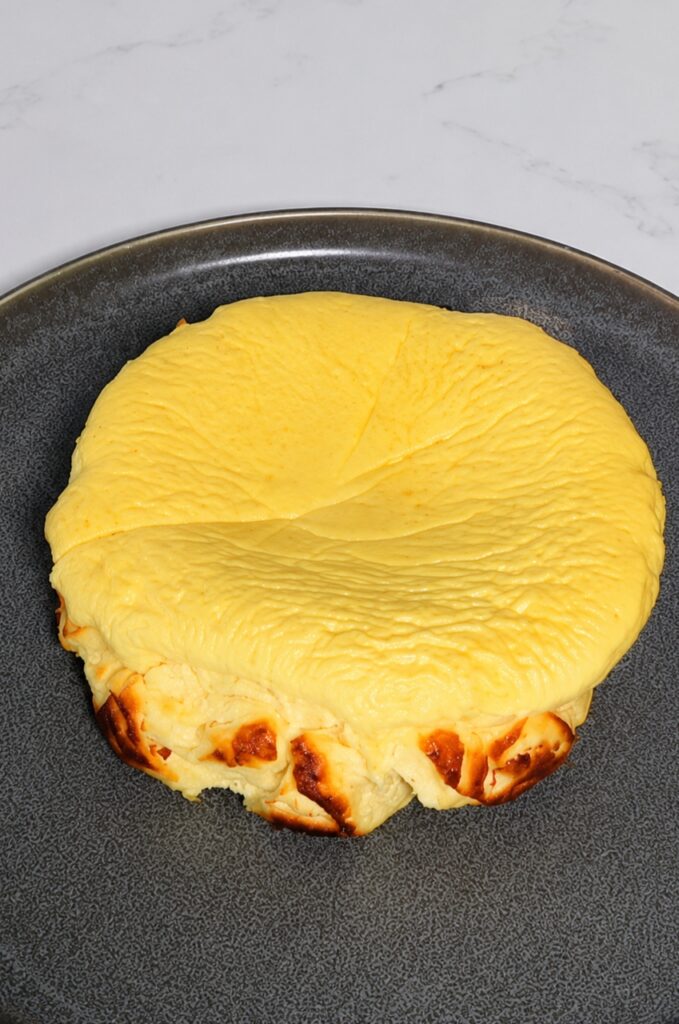
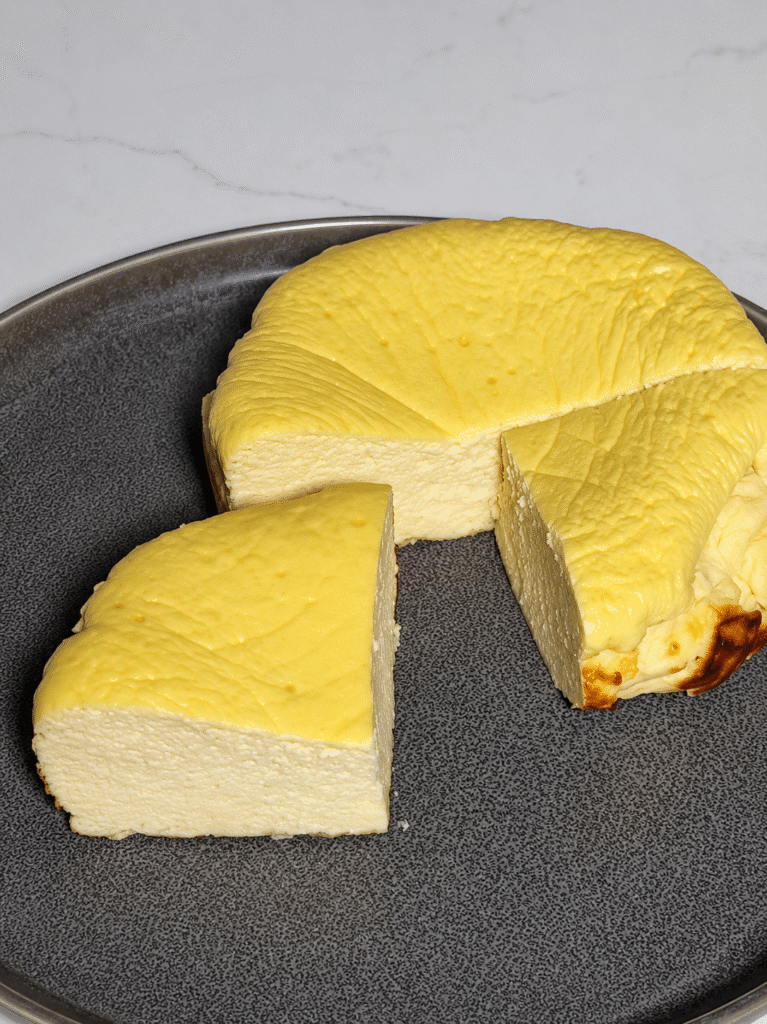
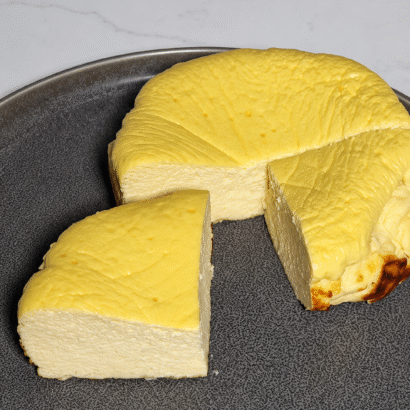
The first time I pulled this perfected healthy yogurt cake recipe out of the oven, I was stunned. It was beautifully domed, slightly jiggley, and had a gorgeous golden-brown top. When I took my first bite, it tasted exactly like a premium, crustless New York cheesecake—creamy, tangy, and perfectly sweet. It instantly became my absolute favorite dessert because it requires zero baking skills, takes five minutes to prep, and packs an incredible amount of muscle-building protein. Let’s look at exactly how to make it perfectly without that rubbery egg texture.

Why You’ll Love This Recipe
- Melt-in-Your-Mouth Texture: No rubbery or spongy layers here. Our specific whipping method guarantees a velvety, custard-like texture that mimics premium cheesecake.
- Insanely High Protein: Packed with real, macro-friendly Greek yogurt, making it a muscle-building treat you can guiltlessly enjoy for breakfast or a post-workout snack.
- Naturally Gluten-Free & Grain-Free: Uses a simple starch binder instead of wheat flour, making it 100% safe for celiac or gluten-sensitive households.
- Zero Added Refined Sugar: Uses a naturally sweetened yogurt base to deliver premium flavor without spiking your blood sugar or causing a midnight crash.
- Only Three Everyday Ingredients: No complicated trips to specialty health food stores required. You likely have everything sitting in your fridge right now.
Key Ingredients
- Greek Yogurt: Provides the tangy, creamy, high-protein base mimicking heavy cream cheese.
- Large Eggs: Build the airy, soufflé-like structure needed to lift the cake.
- Cornstarch: Binds the liquid together to prevent a soggy, wet center.

How to Make This 3-Ingredient Greek Yogurt Cake
Step 1: Prep the Oven and Springform Pan
Preheat your kitchen oven to 350°F (177°C). Grab a 6-inch or 7-inch springform cake pan (or a small round cake pan). Cut a circular piece of parchment paper to fit the bottom, and line the sides of the pan with a high strip of parchment paper as well. Pro Tip: This cake rises significantly as it bakes, just like a soufflé. Having high parchment paper walls supports the batter as it climbs up!
Step 2: Smooth Out the Greek Yogurt
Scoop 1 ¾ cups (approx. 400 grams) of full-fat or 2% vanilla Greek yogurt into a large mixing bowl. Use a silicone spatula or a whisk to stir the yogurt vigorously for about 30 seconds on its own. You want to break up any natural dairy clumps so the yogurt looks completely glossy, smooth, and liquidy before adding anything else.
Step 3: Whisk in the Eggs One by One
Crack your 4 large room-temperature eggs directly into the bowl with the smooth yogurt. Grab a wire whisk or an electric hand mixer and beat the ingredients together heavily for 1 to 2 minutes. You want to incorporate a lot of tiny air bubbles into the eggs. Stop mixing once the yellow batter looks completely uniform and slightly frothy on top.
Step 4: Sift and Fold the Starch Binder
Add 4 tablespoons of cornstarch (or arrowroot powder) to the bowl. To prevent lumps, it is highly recommended to pass the starch through a fine-mesh strainer. Use your whisk to gently fold the starch into the wet batter until it completely disappears. Do not over-mix here—just stir until the powder is fully absorbed and the batter is completely smooth.
Step 5: Pour and Tap the Pan
Pour the smooth, creamy cake batter straight into your prepared parchment-lined cake pan. Lift the pan about two inches off your kitchen counter and gently drop it flat onto the surface two or three times. This simple tapping motion pops any massive, uneven air bubbles trapped at the bottom, ensuring your cake has a uniform, velvety crumb texture inside.
Step 6: Bake and Cool Completely
Slide the pan onto the middle rack of your hot oven. Bake at 350°F (177°C) for 40 to 45 minutes. The cake should be beautifully puffed up and golden-brown on top, with a slight, firm jiggle in the dead center. Turn off the oven, crack the door open a few inches, and let the cake cool down slowly inside the oven for 10 minutes to prevent it from collapsing. Remove it from the oven, let it cool to room temperature on your counter, then chill it in the fridge for at least 2 hours before slicing.
Pro Tips for the Best Recipe
The Slow Cooling Secret: Never pull your hot cake straight out of the hot oven into a cold kitchen! The sudden temperature drop will cause the trapped air to shrink instantly, turning your fluffy cake flat. Turn off the oven, crack the door, and let it sit inside for 10 minutes so it settles gently into a dense, creamy texture.
Choose Thick, Strained Yogurt: Avoid using cheap, watery yogurts. Look for high-quality, thick Greek yogurt (like Fage or Chobani). If your yogurt has pooled water on top, drain it completely before measuring, or your cake will turn out soggy and wet.
Always Use Room Temp Eggs: Cold eggs from the fridge will cause the fats in the Greek yogurt to seize up and clump together. Place your cold eggs in a bowl of warm tap water for 5 minutes before cracking them to ensure a silk-smooth batter.
Level Up the Sweetness: If you are using plain, unsweetened Greek yogurt instead of vanilla, make sure to add ⅓ cup of a granular monk fruit sweetener and 1 teaspoon of vanilla extract to the batter during Step 3 so it tastes like a real dessert.

Storage
- To Store: Keep the cake inside its parchment paper wrapping or place it in an airtight container. Store it strictly inside your refrigerator for up to 5 days. This cake is meant to be eaten cold—the colder it gets, the more it firms up and tastes exactly like rich, authentic cheesecake.
- To Freeze: Slice the cooled cake into individual portions. Wrap each slice tightly in plastic wrap, then place them inside a heavy-duty freezer bag. Freeze for up to 2 months.
- To Thaw: Move a frozen slice into your refrigerator the night before you want to eat it. Let it thaw out slowly overnight so it retains its velvety, custard-like texture perfectly.
Frequently Asked Questions
Why does my yogurt cake taste like an omelet or scrambled eggs?
An overly eggy taste happens if you bake the cake at a temperature that is too high, or if you didn’t whisk the yogurt and eggs together thoroughly enough. Be sure to beat the mixture until it is fully blended and frothy to trap the egg molecules evenly inside the dairy.
Can I use tapioca starch or almond flour instead of cornstarch?
Tapioca starch or arrowroot powder can be used as a direct 1:1 replacement for cornstarch. However, do not use almond flour or coconut flour; they do not have the same liquid-absorbing properties, and your cake will completely separate into a watery mess.
Why did my cake sink down so much after baking?
It is completely normal for this cake to sink slightly as it cools down—just like a French soufflé or a Japanese cheesecake. To minimize a drastic collapse, follow the pro tip of letting it cool down slowly inside the turned-off oven with the door cracked open.
Can I make this in an Air Fryer?
Yes! Pour the batter into an air-fryer-safe pan that fits inside your machine. Air fry at 300°F (149°C) for 25 to 30 minutes until the top is golden-brown and the center is set.

Try These Recipes Also
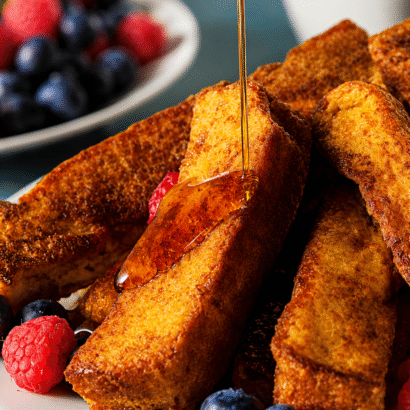
Crispy Keto French Toast Sticks
Fluffy 3-Ingredient Greek Yogurt Cake (No Added Sugar!)
Ingredients
1 ¾ cups (400g) whole milk or 2% Vanilla Greek Yogurt (naturally sweetened)
4 large fresh eggs (warmed to room temperature)
4 tbsp cornstarch (or arrowroot powder)
Instructions
Preheat your kitchen oven to 350°F (177°C). Line the bottom of a 6-inch or 7-inch springform pan with a circle of parchment paper, and place a high 3-inch strip of parchment paper around the inside walls of the pan.
Scoop your thick vanilla Greek yogurt into a large mixing bowl. Take a whisk and stir the yogurt heavily on its own for 30 seconds until any small dairy clumps disappear and it looks completely smooth and glossy.
Crack all 4 room-temperature eggs directly into the yogurt bowl. Use a wire whisk or electric hand mixer to beat the ingredients together vigorously for 1 to 2 minutes until the liquid is fully combined and slightly frothy.
Hold a fine-mesh strainer over your bowl and pour in the 4 tablespoons of cornstarch. Sift it through to remove lumps, then use a spatula or whisk to gently fold the starch into the wet batter just until it completely disappears.
Pour the smooth batter into your prepared pan. Lift the cake pan two inches off your counter and drop it flat against the surface 3 times to force any massive, uneven air pockets to rise to the top and pop.
Bake at 350°F (177°C) for 40 to 45 minutes until the top is golden-brown and slightly firm. Turn off the oven, crack the door open, and let the cake cool inside for 10 minutes. Cool on the counter, then chill in the fridge for 2 hours before slicing.
Notes
Use High Parchment Paper: Always line the inside walls of your pan with parchment paper that sticks up 2 inches above the rim. This cake rises like a soufflé and needs the paper walls for structural support. Stick to Thick Greek Yogurt: Never use thin, regular European-style yogurt. The recipe relies strictly on the heavy, strained density of genuine Greek yogurt to set into a firm cheesecake-style slice. The Cracked-Oven Cooling Trick: Don’t pull the cake straight out into cold air. Let it rest in the turned-off oven with the door cracked for 10 minutes so it transitions slowly without completely collapsing in the middle. Room Temp Eggs are Crucial: Make sure your eggs are not freezing cold. Cold eggs will cause the smooth yogurt proteins to tighten and clump up, leaving you with tiny white specks in your finished cake. Chill Before Slicing: Do not eat this cake warm! It tastes significantly better and locks into a dense, authentic cheesecake texture after sitting in the refrigerator for at least 2 hours.